Understanding Your Remington HC4250 Hair Clippers
Getting to Know the Remington HC4250 Hair Clippers
The Remington HC4250 hair clippers, also known as the Remington QuickCut, are a staple for those seeking an efficient and convenient grooming experience. These hair clippers have garnered numerous customer reviews on platforms like Amazon, highlighting their unique features and competitive price.
Equipped with stainless steel blades and a compact, ergonomic design, this unit offers precision and control. This makes it an ideal choice for those aiming for an easy fade or regular trim without the need for professional help. The clippers are suitable for both wet and dry use, adding to their versatility.
One of the standout features of the HC4250 is its robust remington battery, which ensures long-lasting performance. However, like all batteries, it may eventually need a replacement. It's essential to recognize when your battery life is dwindling. As you explore this aspect, you'll be prepared to maintain the efficiency of your device. This post will guide you through the process of identifying when to replace your battery, and even selecting the right replacement parts.
Additionally, with the range of comb attachments, these hair clippers are designed to handle varying hair lengths, making your grooming sessions quick and easy. The remington titanium coating on the blades further enhances the durability, promising dependable use over time.
Given its comprehensive features and positive ratings, often earning high stars from users, the HC4250 remains a popular choice in hair clippers. If you're considering purchasing this product, or already own one, understanding its components and upkeep can significantly enhance your grooming routine.
Signs Your Battery Needs Replacement
Identifying When It's Time for a Battery Replacement
When you own a beloved Remington HC4250 Hair Clipper, recognizing the early signs of battery failure is crucial. Regular maintenance can extend the life of your clipper, but even the best-maintained devices sometimes need a battery replacement. Your clipper may need a battery replacement if you notice some of the following indicators:- Decreased Performance: If the clipper isn’t cutting through hair as effortlessly as before, or requires more frequent charging, it could indicate a dwindling battery life. The Quickcut feature may not be as effective if the power is inconsistent.
- Shortened Usage Time: A normal charge cycle should provide you with sufficient time for multiple cuts. If you find that the battery life doesn’t match your previous experience or the expectations from customer reviews, then consider looking into a replacement.
- Difficulty Holding Charge: Remington batteries, particularly those found on Amazon, are known for their reliability. If your battery doesn’t hold a charge well after just a few uses, it’s time to check for replacement options.
- Physical Signs: Swelling or leaking are classic signs that a battery is beyond its prime and needs urgent replacement to avoid damage to the unit or steel blades.
Choosing the Right Replacement Battery
Finding the Perfect Power Solution
Replacing the battery for your Remington HC4250 hair clipper requires careful consideration to ensure optimal performance. The right battery will not only reinvigorate your unit but also prolong its life and efficiency. Here's how to make the best choice:- Compatibility: Ensure the battery you choose is compatible with the Remington unit. Opt for those specifically designed for the Remington HC4250 to avoid compatibility issues.
- Quality and Type: High-quality batteries, such as lithium-ion, are recommended for their durability and long life. They provide consistent power and are less prone to memory effect.
- Purchase Sources: Batteries can be purchased from various online retailers. When buying from platforms like Amazon, look for products with favorable customer reviews and a high number of stars to ensure reliability and quality.
- Check the Price: Compare the price of Remington replacement parts across different sellers. While price Remington variants might differ, balance affordability with quality to ensure value for money.
Step-by-Step Guide to Replacing the Battery
Step-by-Step Battery Replacement Guide
Replacing the battery in your Remington HC4250 hair clippers requires attention to detail. Follow these steps to ensure a smooth process and restore your clipper to optimal performance.- Gather Tools and Materials: Before you begin, make sure you have the necessary tools and materials at hand. You'll need a suitable replacement battery compatible with your Remington unit, available on Amazon with good customer reviews. Other essentials include a small screwdriver set, preferably with a Phillips head, for opening the clipper's casing.
- Ensure Safety: First and foremost, unplug the hair clipper if it was connected to a power source. This precaution eliminates any risk of electric shock. Also, ensure your workspace is clean and well-lit to facilitate clear visibility during the replacement process.
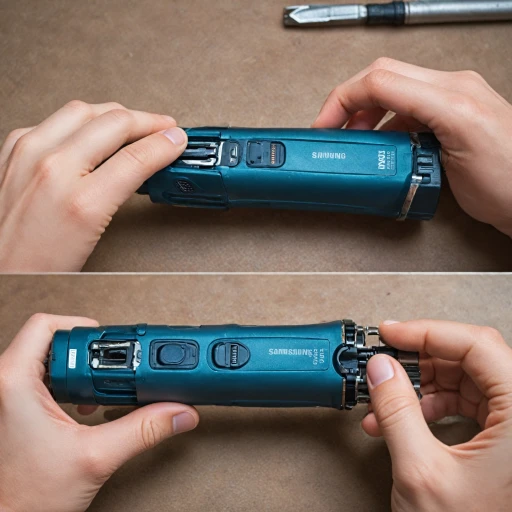
- Access the Battery Compartment: Turn your clipper over to locate the screws securing the casing. Using your screwdriver, carefully remove the screws. Gently open the casing to access the inner components. Pay close attention to the alignment and arrangement of parts, such as the comb and steel blades, to avoid misplacement. It might be helpful to take photos as you go for easy reference during reassembly.
- Remove the Old Battery: Identify the battery compartment, and carefully detach the wires connecting the old battery to the clipper. Note the orientation of the connections — mar (mark) them if necessary, for accurate reinstallation of the new battery.
- Install the New Replacement Battery: Position the new battery in place, connecting the wires in the same manner as the previous one. Ensure all connections are secure to avoid operational issues with your Remington quickcut unit. The alignment should be as per the manufacturer’s guidance, marking straightforward installation.
- Reassemble the Clipper: Once the battery is installed, place the casing back properly, aligning it with the unit. Carefully screw the casing together, ensuring each screw is tightened to secure the structure without over-tightening, as this could damage the casing.
- Test the Clipper: Plug in the clipper and test its functionality. Check efficiency in operation — if your Remington hair clipper powers up smoothly, you've successfully replaced the battery.
Maintenance Tips for Prolonging Battery Life
Preserve the Performance with Proper Care
Maintaining the battery life of your Remington HC4250 Hair Clippers involves more than just replacing your battery with a compatible unit. Regular care and strategic usage can substantially extend its longevity, preventing premature wear and tear.- Charge After Use: Always ensure that you’re charging your hair clipper after each trimming session. This keeps the battery active and avoids power fluctuation issues, ensuring consistent performance with every use.
- Avoid Overcharging: While charging after use is critical, avoid leaving the clippers plugged in for extended periods once fully charged. Overcharging can harm the battery's health, reducing its overall lifespan.
- Store Properly: When not in use, store your clipper Remington in a cool, dry place. This prevents unnecessary exposure to humidity or extreme temperatures, both of which can damage the battery or the clipper as a whole.
- Use the Right Charger: Always utilize the charger provided with your unit or a verified equivalent for your model. Using a different charger could affect the charging efficiency and subsequently degrade the battery.
- Keep Blades Clean: Regular cleaning of your stainless steel blades ensures not only a smooth grooming experience but also decreases the load on the motor. Less power strain means prolonged battery life.
Troubleshooting Common Issues Post-Replacement
Addressing Post-Replacement Challenges
Even after successfully replacing the battery in your Remington HC4250 Hair Clippers, you might encounter a few common challenges. Here’s how to troubleshoot them:
- Clippers not powering on: Double-check the battery's polarity and ensure it’s securely connected. Sometimes, a loose connection can prevent the unit from turning on.
- Shortened battery life: If your new battery seems to drain quickly, consider adjusting your charging habits. Regular overcharging can reduce battery lifespan, so unplug the trimmer as soon as it’s fully charged.
- Overheating during use: This could indicate an internal issue beyond the battery. Inspect other components like comb and blades for wear and damage. Regular maintenance, such as cleaning and lubricating the cutting system, can also help.
- Performance inconsistencies: If your hair trimmer's performance seems to fluctuate, check for proper assembly of replacement parts and ensure no debris is causing obstruction. Also, ensure you’re using compatible accessories, like the correct steel blades or combs, which contribute to the unit’s efficiency.
Should these solutions not resolve the issue, consider consulting the Remington customer support or checking customer reviews on Amazon for additional insights. Remember, using replacement parts specifically designed for the Quickcut unit can make a significant difference in overall performance.